TopView can deliver spoken alarm messages to phones over an Ethernet network using a VOIP Phone System. If you are unfamiliar with TopView VOIP support please read this overview.
Numbers should not contain dashes, spaces, and other non-numeric characters.
Some VOIP Systems will fail to make calls if the phone number you are calling contains dashes, spaces, or other non-numeric characters. Please ensure that any manually typed phone numbers or Contact phone numbers used with VOIP are entered without non-numeric characters. Example: Phone number 1234567890 works but 123-456-7890 fails.
Note: TopView Voice Notification settings include an option to remove non-numeric characters from phone numbers.
The VOIP Phone System used by TopView may be an internal company VOIP system or a hosted/cloud VOIP System. There are many hosted VOIP Systems available and most of the should work with TopView if they support the SIP protocol.
Here are a few VOIP Providers that we have successfully tested with TopView.
If using a trial account, you may need to use the trial phone number in the TwiML’s callerID field. Replace the {{From}} text with the trial phone number.
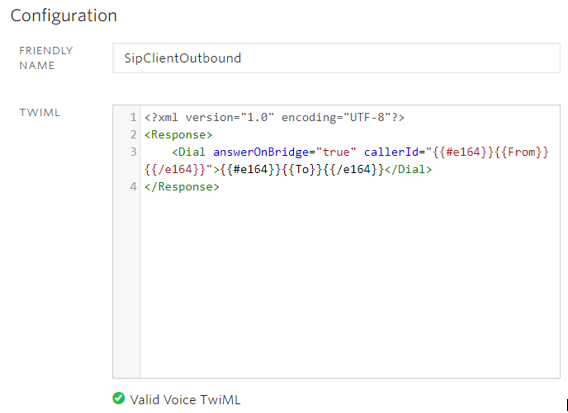
Click the red Create new SIP Domains or click the red plus sign (‘+’)
Enter a friendly name and give your SIP URI a unique name (yourdomain) Example SIP domain/URI: yourcompany.sip.twilio.com
Voice Authentication:
Click (‘+’) next to credential list and provide a friendly name, then add the username and password for your SIP client.
Username suggestion: Make your devices username(s) the Twilio number you will bind to this client Example username: 15005551212 These should match the Twilio numbers you just purchased.
Enter a password. Record this password and click create.
Call Control Configuration
A call comes in: select “TwiML Bin” from the first dropdown and “SipClientOutbound” from the second dropdown
Note: SipClientOutbound was created in the previous step
Set SIP Registration to enabled
Click into the SIP Registration Authentication credential list and select the credential list you created
If using a trial account, only verified numbers can be used for outbound calls and SMS testing Trial plans are only allowed to call “verified” numbers. You must verify your test phone number with Twilio before you will be able to call it. See Adding a Verified Phone Number or Caller ID with Twilio – Twilio Support for more information.
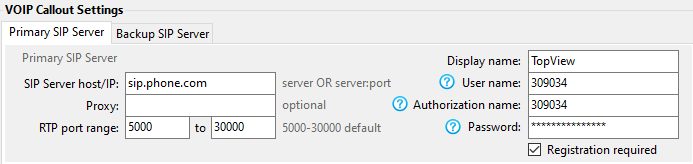
Configure TopView VOIP Notification for your Twilio account
Launch the TopView Configurator and navigate to the Voice Notification settings screen
Enter the following information in the VOIP Callout Settings:
SIP Server host/IP: enter the SIP domain that you created with .us1. as shown in this example: For SIP domain yourcompany.sip.twilio.com Enter your SIP server as yourcompany.sip.us1.twilio.com
Proxy: leave this field blank
Display Name: TopView (or any other name you would like to use)
User name: the SIP username you configured (we suggested to use your phone number in the previous step) Example username: 15005551212
Authorization name: same as User name
Password: The password for the SIP credentials recorded in the previous step
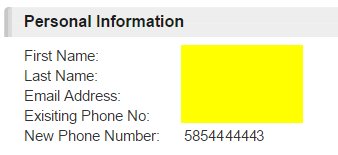
Your new VOIP Phone number is displayed under Personal Information as “New Phone Number”
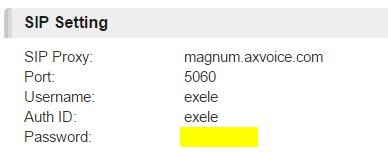
Scroll to the bottom of the screen and click SIP Settings
You SIP Settings will be displayed.
Test making and receiving calls using the 3CX Soft Phone
Download the 3CX Phone 6 for Windows.Note: Please download from our link. Newer versions of this soft phone will only connect to the 3CX VOIP Provider
When you first launch the 3CX phone, click the [Create Profile] button then click [NEW] to create a new account.
Account name: enter any name. Example=AXVOICE
Caller ID: Enter any name
Extension: Enter your SIP username
ID: Enter your SIP username
Password: your SIP password (note: this is not the same as your AXVOICE.com web logon password)
IP of the PBX/SIP Server. Select “I am out of the office” and the SIP Proxy (magnum.axvoice.com)
Click [OK] to close the account settings screen.
On the Accounts screen, make sure the the account is selected (check box before account) and click [OK]
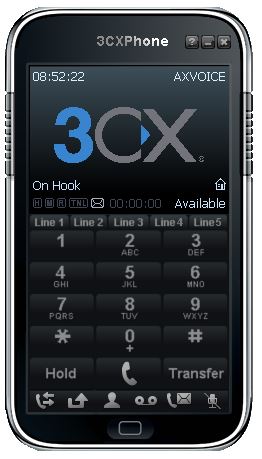
If the 3CX phone successfully connects to the AXVOICE SIP Service, you should see the account name in the upper right corner of the phone and “On Hook” as the status (see example phone to the right).
Test making phone calls to and from the 3CX phone. The phone number for the 3CX phone is your AXVOICE “New Phone Number”.
Configure TopView VOIP Notification for your AXVOICE account
Launch the TopView Configurator and navigate to the Voice Notification settings screen
Enter the following information in the VOIP Callout Settings:
SIP Server host/IP: enter the AXVOICE SIP Proxy name (magnum.axvoice.com)
Proxy: leave this field blank or enter the same SIP Proxy (magnum.axvoice.com)
Display name: TopView (or any other name you’d like to use)
User name: the SIP Username
Authorization name: (same as User name) the SIP Username.